Git Commit Message规范
前言
提交规范选择
当一个项目有着频繁大量的git提交,如果提交信息能够规范起来,可以大大减少回溯问题的时间成本。规范的提交信息还可以用作CHANGELOG。
查询了一下大厂和开源项目的gitcommit提交规范,比较流行的是Conventional Commits规约。这套规约是在Angular convention的基础上进行改造和扩展,形成了一套简约轻量级的提交约束规范。
工具
既然有了规范,如果能有工具进行约定和限制就更好了。把约定俗称,变为开发规定。
进行约束git commit message的工具有很多,我们这里既然使用Conventional Commits,就去找了Conventional Commits相关的工具。下面是本文用到的工具列表
- commitizen :用来规范化提交的git命令号工具,
- cz-conventional-changelog :Conventional Commits规范,它和commitizen 配合使用,让commitizen 使用Conventional Commits规约来约束
- commitlint git hook的规则,提供Conventional Commits在git hook上的规则
- husky git hook小工具,它可以方便的应用一些hook规则
总结一下我们要用到的工具:
- 提交时编写符合规则的message工具:commitizen负责提供一个git提交命令行程序,它使用的规则由cz-conventional-changelog来提供。
- 提交后的检测工具:husky 用来简易的使用git hook,而真正的检测规则提供者是commitlint
git hook本质上提供了一套检测时机,可以在和git交互的过程中介入。我们用到的git hook就是commit-msg。常用的git hook还有pre-commit,在提交前检查提交的内容,可以静态检测提交代码来决定是否允许提交
规范简介
一个符合Conventional Commits规范的提交信息样板
1 | <type>[optional scope]: <description> |
- type:提交类型,冒号后面要有空格。简单的说有feat,fix,docs等等。具体可查看 @commitlint/config-conventional。注意,既然是规范,type类型是固定,一定要是规则里面有的。不要自己创造什么task,update,delete
- scope 影响返回
- description简单描述,相当于标题
- optional body可选的内容,提交的详细描述。注意,该选项和上面要有空行
- optional footer(s)可选的注脚,一般在进行重大修改,影响了别的模块的时候,一定要写。注意,该选项和上面要有空行
很简单吧?
举个例子(官网上的)
1 | fix: correct minor typos in code |
修复了一个bug的提交,它的bugid是133
type只允许以下几个
- feat:新功能(feature)
- fix:修补bug
- docs:文档(documentation)
- style: 格式(不影响代码运行的变动)
- refactor:重构(即不是新增功能,也不是修改bug的代码变动)
- test:增加测试
- chore:构建过程或辅助工具的变动
如果type是feat和fix,一定会进入你生成changelog。别的可以指定
开始吧
工具安装
因为这些工具,规范都是基于Conventional Commits规约,而Conventional Commits规约由是从Angular团队(一个基于js的web开发框架,google的。)发展而来,所以好多工具都是在node的基础上安装的,没有node的请自行安装。推荐使用nvm来管理node版本(不要用n)。
全局安装commitizen 和 cz-conventional-changelog
在终端里执行
1 | npm install -g commitizen cz-conventional-changelog echo '{ "path": "cz-conventional-changelog" }' > ~/.czrc |
解释一下:
- npm是node的命令
- 这里-g是指全局安装,本命令同时安装了两个模块,commitizen和cz-conventional-changelog
- echo ‘{ “path”: “cz-conventional-changelog” }’ > ~/.czrc是指往.czrc文件里写入一句配置,指定了commitizen使用的规则就是cz-conventional-changelog
现在可以试一下了,用git cz来代替git commit命令,你会发现git提交变成一个有交互引导的过程
1 | ➜ testgitcommit git:(master) ✗ git cz |
输入git cz后,会让你选是一个什么类型的提交。这里我选定的是feat,一个新功能。一路回车
1 | ? Select the type of change that you're committing: feat: A new feature |
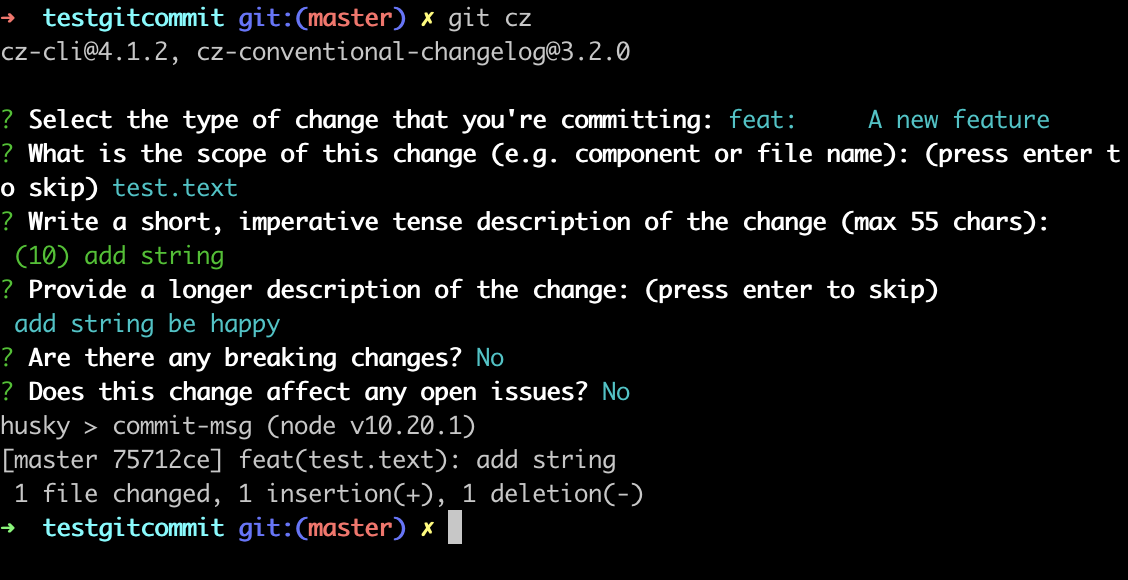
最后提交到git上的message就是这样的
1 | feat(test.text): add string |
类型是feat,范围是test.text,小标题是add string,主题内容是add string be happy
安装commitlint 和 husky
这两个工具是为了在git层面上限制提交的,所以我们要装在项目内,如果你想全局安装也可以。
安装前,这里有个需要注意的地方,不然会失败
因为这两个工具是node的工具,所以安装前项目根目录中要有package.json
可以使用npm初始化一个,也可以自己创建一个空的。
一切准备就绪,命令行执行
1 | cd 项目根目录 |
同样的,安装了三个model:husky,@commitlint/config-conventional,@commitlint/cli
配置1
安装完成后,调用命令行调用
1 | echo 'module.exports = {extends: ["@commitlint/config-conventional"]};' > ./commitlint.config.js |
在项目根目录创建一个文件commitlint.config.js,并写入配置
配置2
在安装成功后,package.json内容应该多了
1 | "devDependencies": { |
我们再把husky的相关配置写入进去,平级添加
1 | "husky": { |
用commitlint,在hucky的配置下,添加到git hook上
调试使用
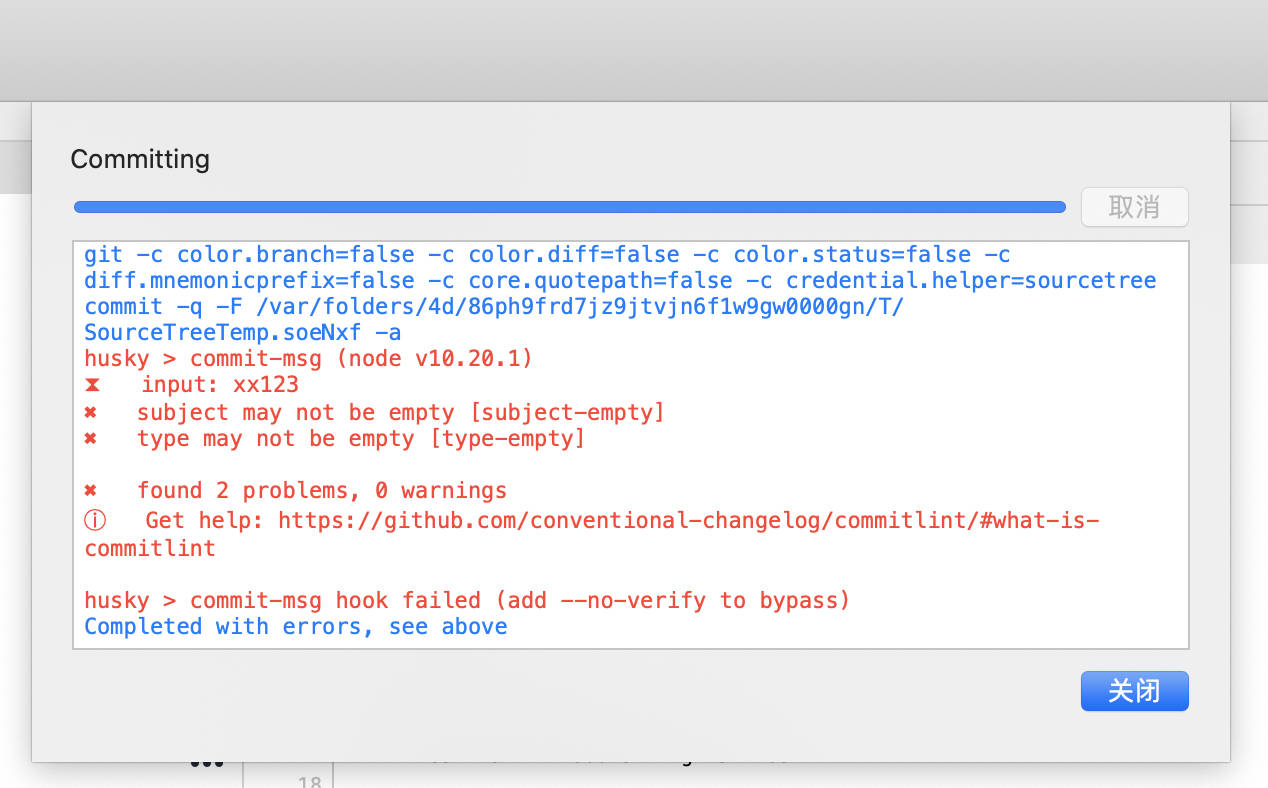
配置到这里应该就大功告成了,来试一下非法提交,命令行提交一条记录
1 | ➜ testgitcommit git:(master) ✗ git add test.text |
可以看到,它提示了subject may not be empty [subject-empty]和type may not be empty [type-empty]。最后它还告诉你,如果想跳过git hook,可以添加–no-verify参数
使用提交信息生成changelog
conventional-changelog
工具安装
在命令行执行
1 | npm install -g conventional-changelog-cli |
生成文件
安装完毕后,执行
1 | # 不会生成changelog文件,会在头部增加自上个版本以来的 |
简化配置
因为是node项目配置,所以这里我们可以使用nodejs的配置来简化命令
在package.json中增加script节点,里面的每一个key value都是可以执行的命令
1 | "scripts": { |
我们可以直接运行
1 | npm run changelog |
这时你会发现,根目录多个changelog.md文件,内容是
1 | # (2020-05-15) |
发现问题了没?没有版本号
版本控制
简单说下npm的version
正常流程,生成changlog前需要升级版本号,而node项目升级版本号需要执行npm version xxx,
执行后node工具会自动把package.json中的version版本号给改掉,然后在git上打标签后自动提交。
以下是我指定版本号后的changelog,自动生成的tab就是v1.0.1
1 | ## [1.0.1](/compare/722ad73d9a44158e861619ac8c357264ef832f47...v1.0.1) (2020-05-15) |
node项目版本号的更多内容,可以参考版本号管理策略&&使用npm管理项目版本号这篇文章。
当然我们自己有版本号控制,不需要npm多操心,这里可以多参考conventional-changelog –help命令帮助,看看怎么生成你心仪的changelog
Standard Version
这个工具也是Conventional Commits规约推荐的生成changelog和版本发布打tag的工具
想使用可以看下readme
IDE插件和模板设置
AndroidStudio
- Conventional Commit: provides extensible context and template-based completion, and inspections, for Conventional Commits inside the VCS Commit dialog. Available for all JetBrains IDEs.
- 这个界面和原VCS界面一样,只是在提交的时候,有联想关联提示
- Git Commit Template: Add Conventional Commits support to JetBrains Editors (IntelliJ IDEA, PyCharm, PhpStorm…).
- 这是直接有一个UI让你填入各种type,scope信息。
SourceTree
只能设置模板
我这里只是简单设置,如果规约熟悉了之后,可以不用设
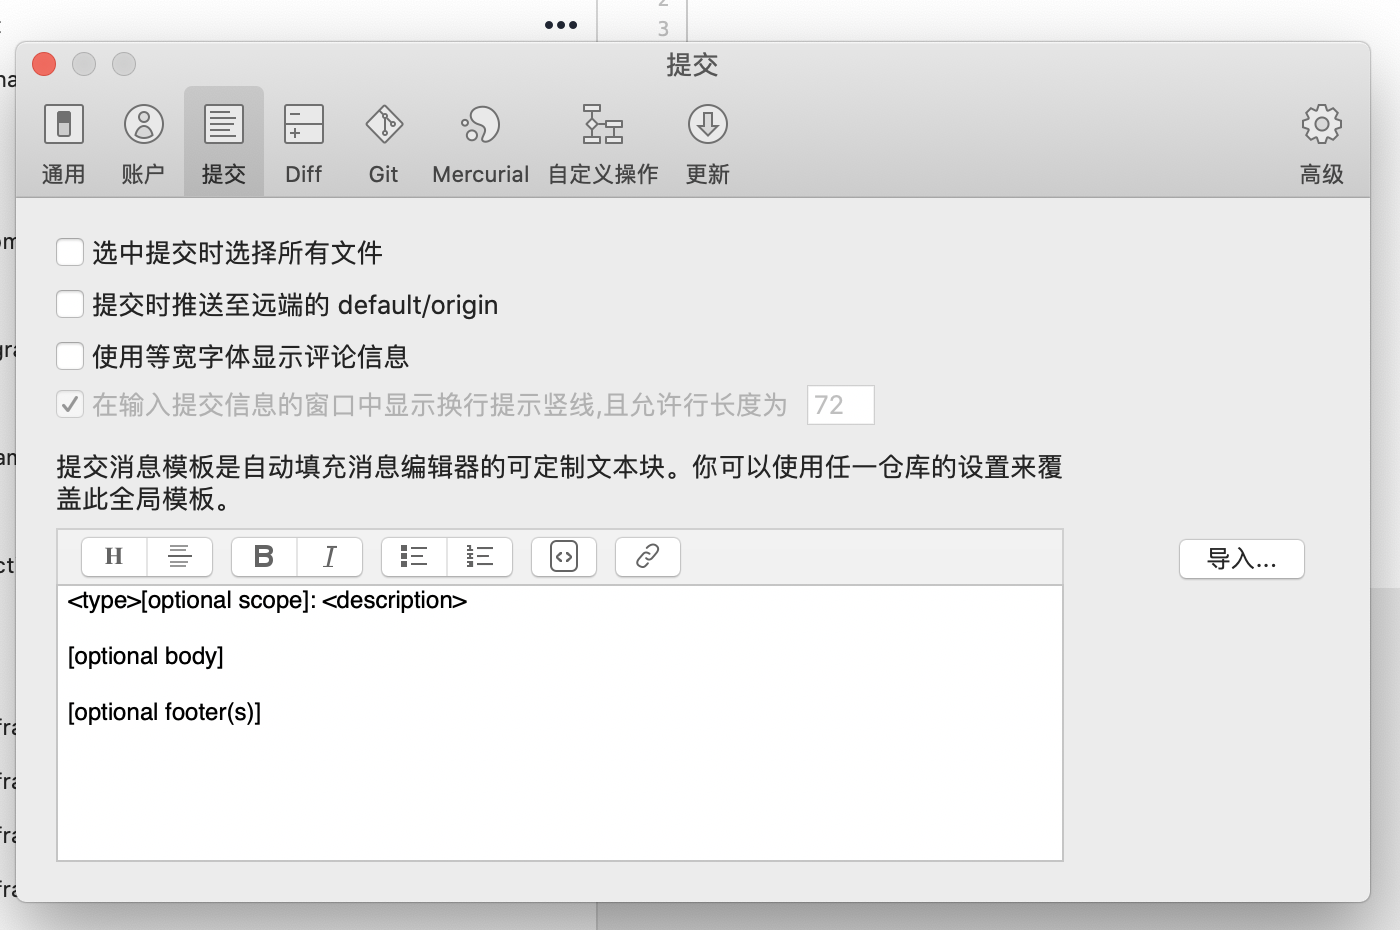
Git 提交全局模板
先去~/.git/目录下创建一个模板文件commit.txt,内容随你
1 | git config --global commit.template ~/.git/commit.txt |
或者也可以修改.git目下的config
1 | [commit] |
遇到的坑
package.json
package.json要提前创建好,再去安装commitlint 和 husky,不然配置写不进去,到时候一脸懵逼
node版本问题
因为husky要node版本>10,我本机的node版本是8.x,所以就用nvm安装了一个10.x的node,结果以前全局安装的npm工具模块都要重新安装。当重新使用npm安装arcanist (公司团队arcanist来进行codereview)的时候,发现版本过高,arc没有顺利安装成功,命令没法用了。
解决办法:其实arc已经安装成功了,只是npm里面一些函数再创建arc命令的软连接时失败了。这时,我们找到nvm的node版本的bin目录和arc模块的bin目录,重新手动把arc模块的命令shell软连接到node中就可以了
下面是我本机的目录
arc shell的具体路径
/Users/xxx/.nvm/versions/node/v10.20.1/lib/node_modules/arcanist/arcanist/bin/arc
node执行文件目录
/Users/xxx/.nvm/versions/node/v10.20.1/bin
把原先/Users/xxx/.nvm/versions/node/v10.20.1/bin中的arc删掉,然后执行
1 | ln -s xxx/arc xxx/arc |
命令软连接过去就行了
SourceTree的非法提交没有被阻止
由于SourceTree会默认使用内置的git版本,而不使用你本机的。所以修改SourceTree的内置git版本,大于2.13.0就行了,我的是2.13.2
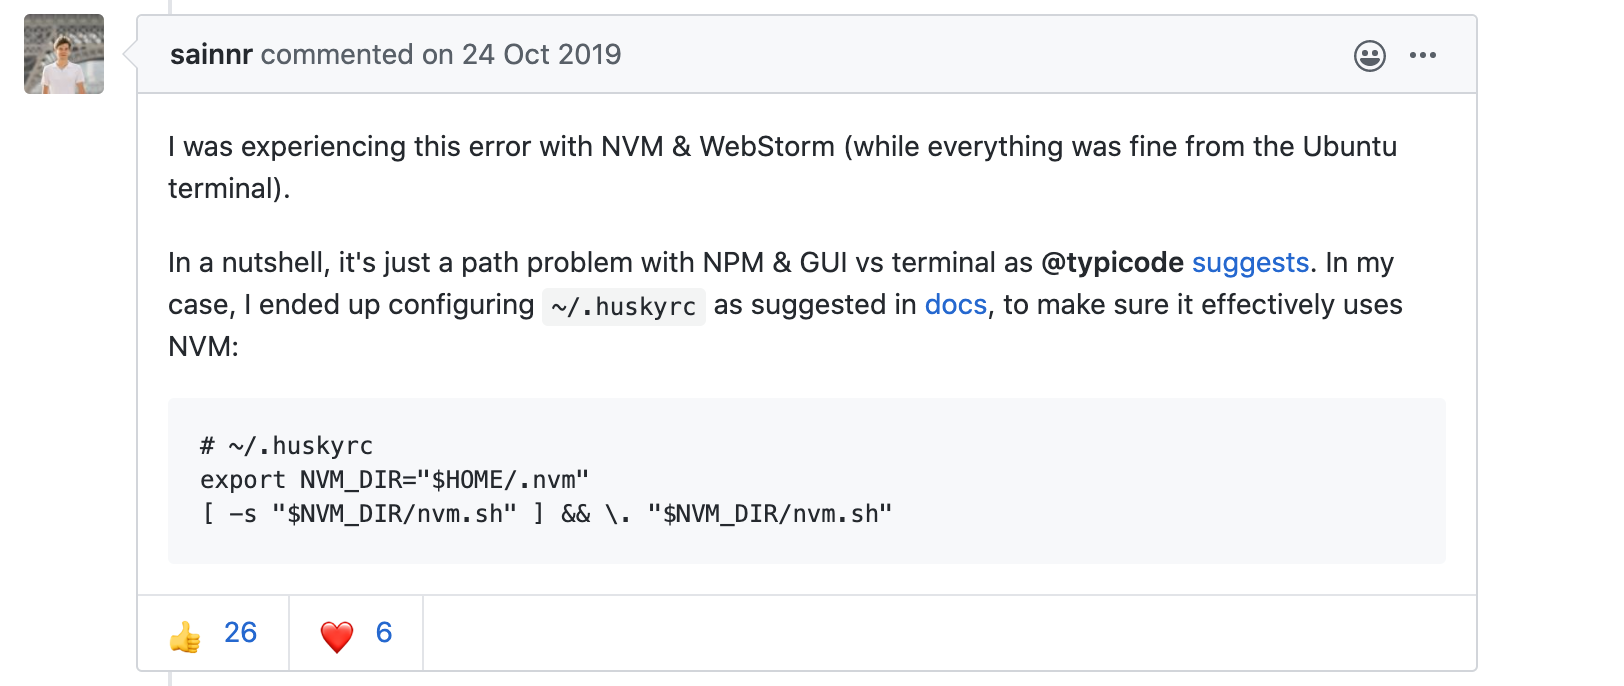
如果还是没阻止(hook没起作用),提交的时候打开【显示命令历史】,看下有没有什么错误。如果出现Skipping commit-msg hook的时候,需要在根目录创建一个husky的配置文件.huskyrc,内容填写
1
2export NVM_DIR="$HOME/.nvm"
[ -s "$NVM_DIR/nvm.sh" ] && \. "$NVM_DIR/nvm.sh"再去试试应该就行了
下面是解决sourcetree问题搜到的issues
[issues390][https://github.com/typicode/husky/issues/390]